


Sign Up Process #
- Start your Free Trial:
-
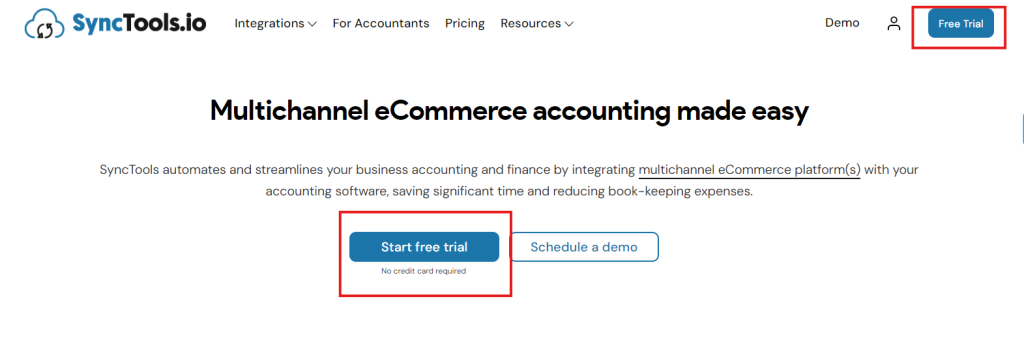
- Begin by visiting the Synctools website. On the homepage, locate the “Free Trial” button to start the process. Click on the button to initiate the signup process.
- Choose Your Platform:
-
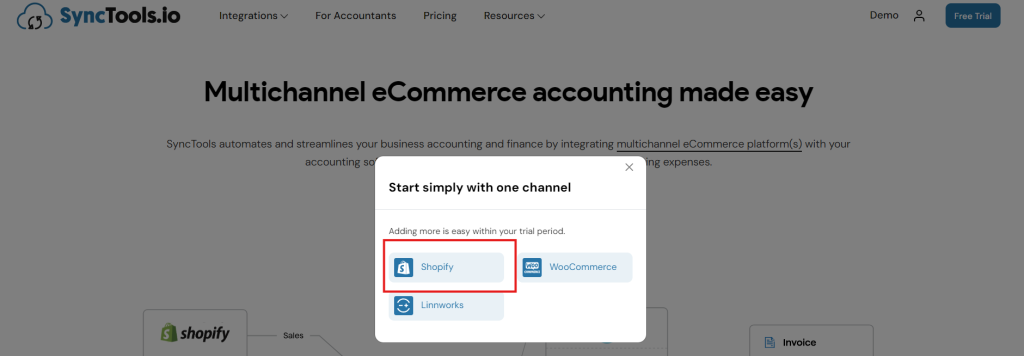
- A new window will pop up, asking you to select the e-commerce platform you want to integrate with Synctools. Choose Shopify from the available options (Shopify, Linnworks, WooCommerce).
- Setting Up Your Account :
-
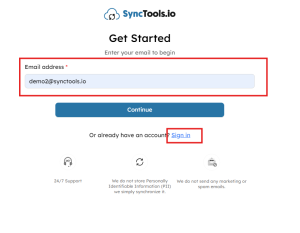
- After selecting Shopify, you will be redirected to the Synctools Sign Up page.
- Enter your email address to begin the sign-up process.
- If you already have an account, click on “Sign in.”
- Verify Your Email:
-
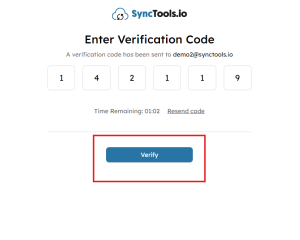
- Once you click “Continue,” a verification code will be sent to the email address you provided.
- Check your email inbox, copy the code, and enter it on the Synctools page to verify your account.
- Click “Verify.”
Register Your Account #

After verifying your email, complete your registration by providing the following details on the registration page:
- Name, Role (Admin or Accountant), Mobile Number, and Company Name.
- Select your Country, Time Zone, Industry, and Revenue from the dropdown menus.
- Create a strong Password to secure your account.
Review the details for accuracy and click Sign up to finish.
Invite an Accountant or Bookkeeper #
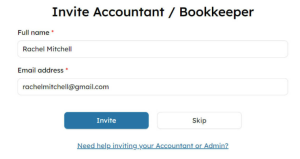
- Decide Whether to Invite:
- During registration, you’ll be asked if you have an accountant or bookkeeper. If you want to invite one, select “Yes.” If not, choose “No” to skip this step.
- If you choose “Yes,” you will be prompted to enter the accountant or bookkeeper’s details.
- Send the Invitation:
- Enter their Full Name and Email Address in the respective fields.
- Click “Invite.”
- Synctools will send an email invitation to the accountant or bookkeeper with instructions on accessing your Synctools account. Make sure you provide the correct email address to avoid any issues.
- Review the Invitation Status:
- After sending the invitation, the accountant or bookkeeper will receive an email, and you can monitor the invitation status on your Synctools dashboard.
- If at any point you decide you don’t need to invite an accountant, simply click “Skip.”
Welcome Screen: Simplifying SyncTools #
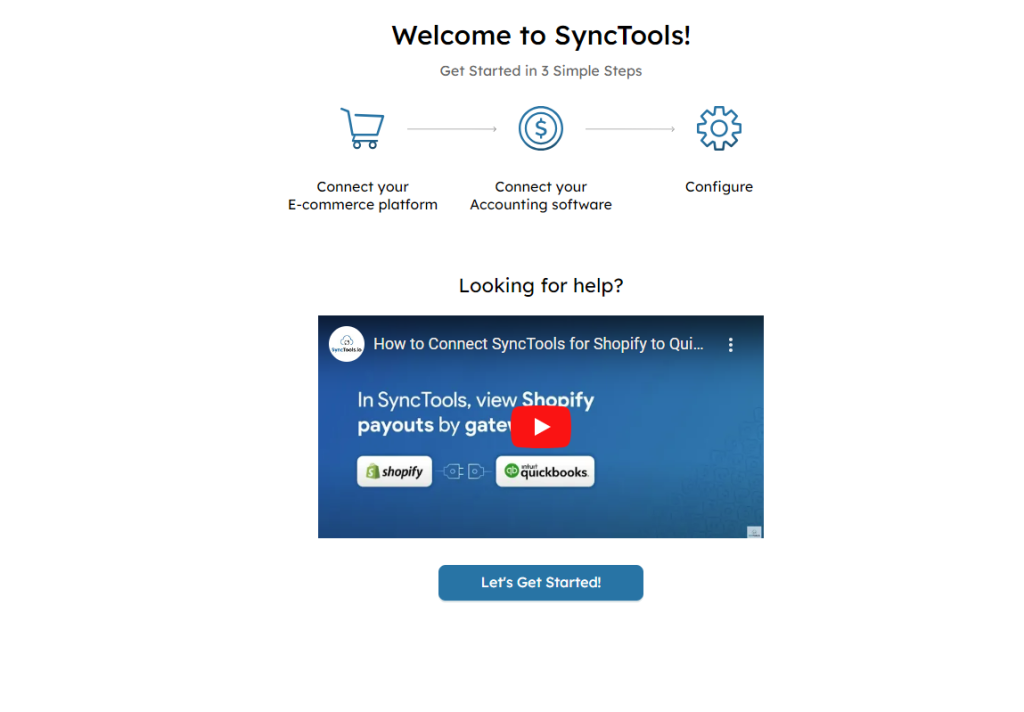
This screen provides a quick overview of how SyncTools works in three simple steps:
- Connect your e-commerce platform.
- Integrate your accounting software.
- Configure your settings for seamless synchronization.
A helpful video tutorial is also available to guide you through the setup process step-by-step. Use this screen as your starting point to understand and begin your SyncTools journey effortlessly! ?
Connecting E-commerce and Accounting Tools #
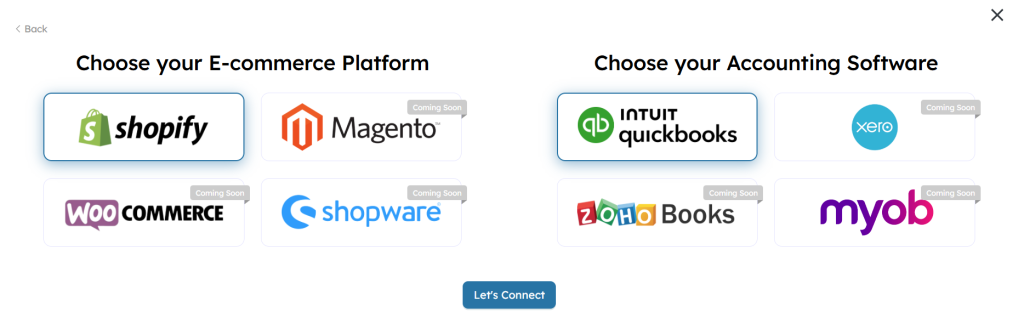
- Connect Your E-commerce Platform
Select the platform where your store is hosted. This ensures SyncTools can retrieve your orders, payouts, and other financial data for processing.
- Choose Your Accounting Platform
Select the accounting software where you want to sync your financial data. This step ensures all transactions are accurately recorded and categorized in your books.
Click “Let’s Connect” after making your selections to start configuring the synchronization process. SyncTools will guide you through connecting and authorizing your accounts to complete the setup.
Shopify and QuickBooks Connection Confirmation #
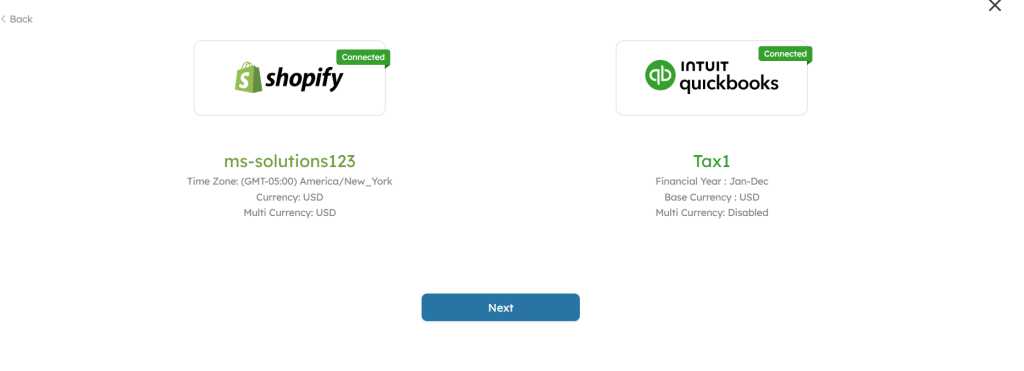
This screen confirms that your Shopify Store and QuickBooks Online Account have been successfully connected. It also displays essential details about each platform for verification and review before proceeding with the synchronization process.
Choosing How Your Sales Data Syncs #
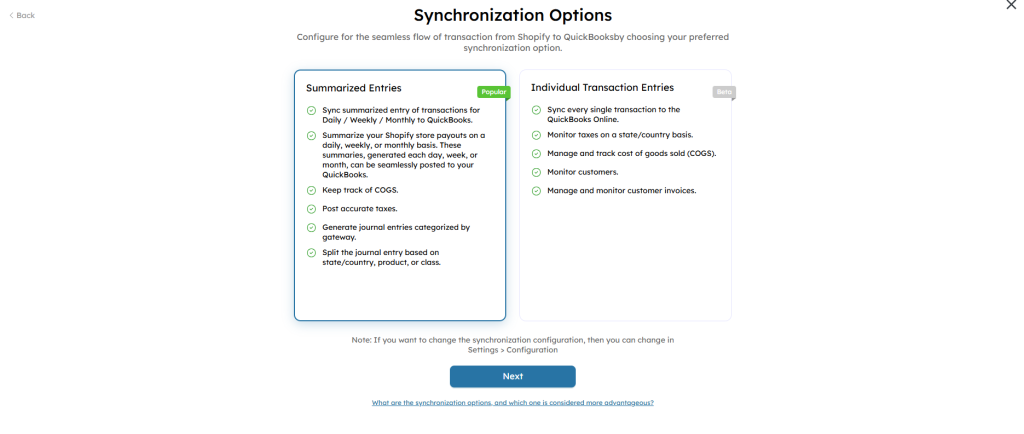
In the settings, you’ll find “Configuration” option where you’ll see two main choices for how your Shopify sales data gets sent to QuickBooks Online:
1. Synchronization Options #
You can choose how the data should be synced to QuickBooks Online based on your business needs:
- Summarized Entries (Recommended)
Data from Shopify is summarized (daily, weekly, or monthly) before syncing to QuickBooks Online.
Ideal for businesses managing high transaction volumes to reduce clutter in QuickBooks Online. - Individual Transaction Entries
Every single Shopify transaction is synced to QuickBooks Online.
Best for businesses needing detailed visibility into individual orders, taxes, and invoices.
2. Frequency of Journal Entry Creation #
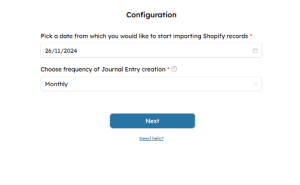
Choose the interval for syncing Shopify data to QuickBooks Online:
- Daily: Creates one journal entry per day.
Scenario: You run an online store that generates 10 orders per day in Shopify.
How it Works:
- All 10 orders from a single day are summarized into one journal entry.
- The journal entry includes the total sales, taxes, shipping income, fees, etc… for that day.
- Weekly: Consolidates data into one entry per week.
Scenario: You choose to sync data weekly to capture a broader view of transactions.
How it Works:
- Orders from July 1 to July 7, 2024 are grouped into one journal entry.
- Shopify payouts, taxes, expenses, etc…for the week are summarized.
- Monthly: Summarizes all transactions for the month into a single entry.
Scenario: You prefer monthly summaries to match Shopify payouts with your bank reconciliation.
How it Works:
- Orders from July 1 to July 31, 2024 are grouped into one journal entry.
- Includes a complete summary of revenue, taxes, fees, and shipping income for the month.
3. Select Start Date #
Pick the date from which Shopify data should start syncing to QuickBooks Online.
- Example: If you choose 01/07/2024, all orders from this date onward will be included in the sync process.
4. Save Configuration #
Once all preferences are set, click Next to confirm your choices. The system will begin syncing Shopify data according to the specified settings.
? Note: Be sure to select the correct frequency and start date to ensure data accuracy and alignment with your QuickBooks Online setup.
Choose Countries: Configuring Your Business Operations #
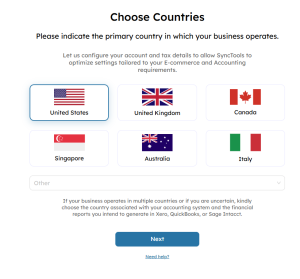
Here SyncTools allows you to specify the primary country where your business operates. Selecting the right country helps SyncTools optimize settings for accurate tax and financial reporting tailored to your e-commerce and accounting needs. Also helps to group data by country.
How It Works
Select Your Country:
- Choose from the list of supported countries (e.g., United States, United Kingdom, Canada, etc.).
- If your country is not listed, select Other and enter it manually.
For Businesses Operating in Multiple Countries
- If your business operates across multiple countries, select the country associated with your accounting system and the financial reports you intend to generate.
- Example:
- If your Shopify store operates in the US and UK but your accounting is managed under US standards, select United States.
Next Steps #
Once you’ve selected your country, click Next to proceed with configuring tax and regional-specific synchronization rules. SyncTools will ensure your settings are perfectly tailored to your business location! ?
Choose Additional Countries: Expanding Business Configuration #
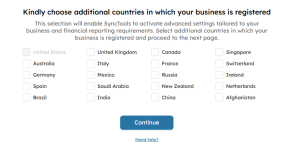
This configuration allows you to select additional countries where your business is registered. By doing so, SyncTools will activate advanced settings tailored to your financial reporting and tax compliance needs across multiple regions.
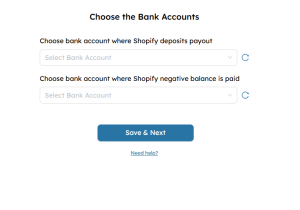
Choose the Bank Accounts: Managing Payouts and Negative Balances #
This helps you configure your bank accounts for handling Shopify payouts and any negative balances. Selecting the right accounts ensures smooth financial tracking and reconciliation in QuickBooks.
Configuration Options #
- Choose Bank Account Where Shopify Deposits Payout:
- Select the account that receives Shopify payouts (e.g., revenue from orders processed).
- This account will be credited with the payout amounts synced from Shopify.
- Choose Bank Account Where Shopify Negative Balance is Paid:
- Select the account that covers any negative balances (e.g., refunds exceeding payouts, Shopify fees).
- This account will be debited for negative balance settlements.
Why This Is Important #
- Accurate Reconciliation:
- Ensures all deposits and expenses related to Shopify transactions are recorded in the correct accounts, making bank reconciliations easier.
- Improved Financial Tracking:
- Separating positive payouts and negative balances helps maintain clarity in financial records.
- Customized to Your Workflow:
- SyncTools allows you to use different accounts for payouts and negative balances, catering to businesses with complex bank setups.
Refresh the account list (using the refresh icon) to ensure all recently added accounts in QuickBooks are available for selection.
Next Steps #
Click Save & Next after selecting the appropriate accounts. SyncTools will apply these configurations, ensuring payouts and negative balances are accurately posted to QuickBooks.
Account Mapping: Simplifying Setup and Customization ⚙️ #
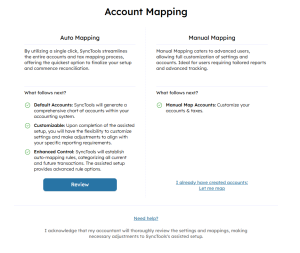
1. Auto Mapping ✨ #
Auto Mapping automates the entire process, offering a quick and efficient way to map your accounts and tax settings.
What follows next? #
- Default Accounts:
- SyncTools automatically generates a comprehensive Chart of Accounts in QuickBooks.
- This includes default mapping for common transaction types like sales, refunds, and expenses.
- Customizable:
- Once Auto Mapping is complete, you can customize the setup to meet your unique reporting requirements.
- Adjust mapped accounts or tax rules easily after the initial setup
2. Manual Mapping #
Manual Mapping provides full control over the setup, allowing you to customize accounts and tax mappings to your exact specifications.
What follows next? #
- Manual Map Accounts:
- Select specific accounts and tax rules for every transaction type.
Mapping Accounts: Manual Mapping vs. Auto Map Feature #
This section provides two options for mapping Shopify transactions to QuickBooks accounts:
- Manual Mapping
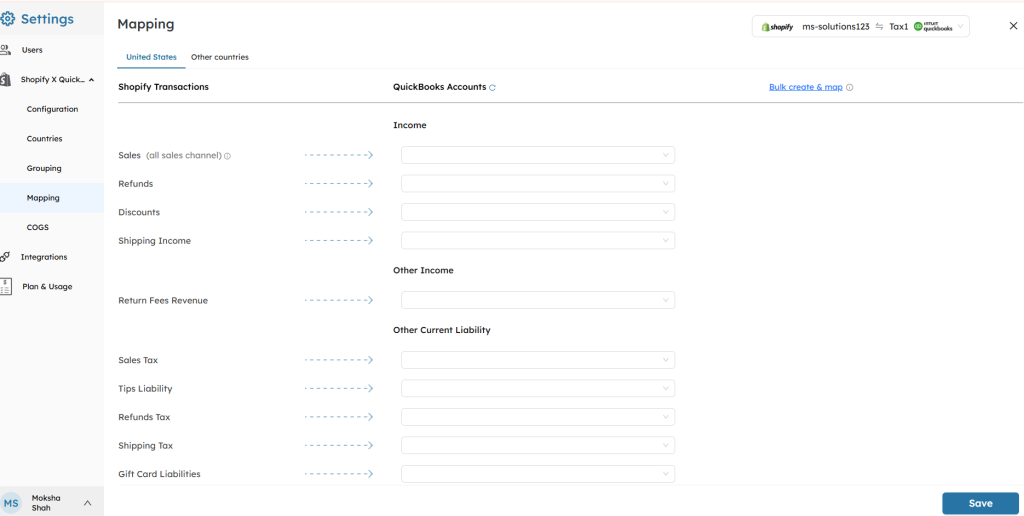
How It Works #
- Manually map each Shopify transaction type (e.g., Sales, Refunds, Discounts) to the corresponding QuickBooks account.
- You select specific accounts for income, liabilities, and taxes, ensuring precise control over your financial records.
When to Use #
- Ideal for advanced users or accountants who prefer full customization.
- Suitable for businesses with unique accounting structures or reporting requirements.
Steps: #
- Choose the transaction type under Shopify Transactions (e.g., Sales, Refunds).
- Map it to an appropriate account in QuickBooks under QuickBooks Accounts.
- Save your selections to finalize the mapping.
? Pro Tip: Use Manual Mapping if your Chart of Accounts in QuickBooks has custom account names or structures.
- Auto Map Feature
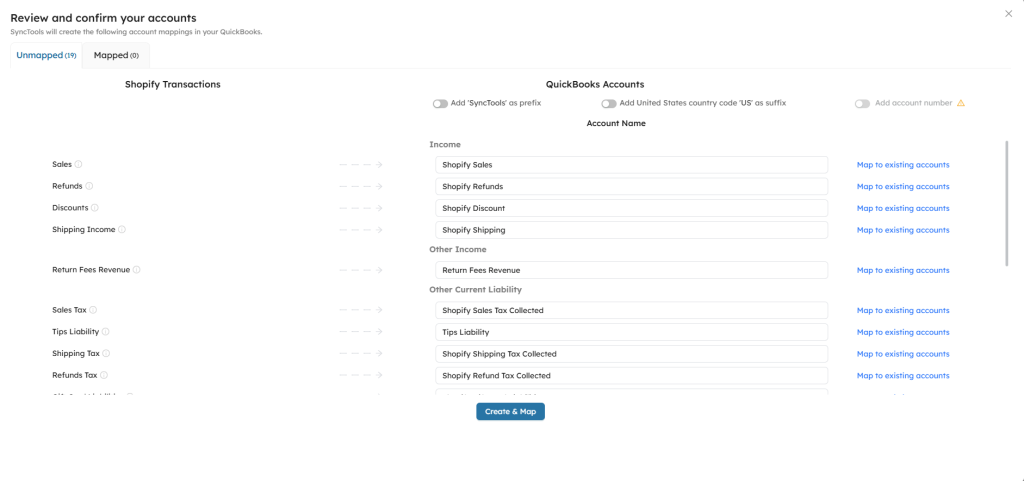

How It Works #
- Automatically maps Shopify transactions to QuickBooks accounts in bulk.
- SyncTools generates default accounts (e.g., Shopify Sales, Shopify Refunds) and maps them instantly.
- Optional toggles allow customization, like adding prefixes (e.g., “SyncTools”) or suffixes (e.g., “US”) to account names.
When to Use #
- Best for users who want to save time and start syncing quickly.
- Ideal for standard Shopify-to-QuickBooks setups.
Steps: #
- Review the list of unmapped transactions under Unmapped.
- Use the Create & Map option to auto-generate and map accounts for all Shopify transaction types.
- Review the mapped accounts under the Mapped tab for accuracy.
- Customize further by editing account names or selecting existing accounts.


