


Before SyncTools can properly convert foreign currencies from your Shopify store to your home currency in QuickBooks, you need to enable and configure multicurrency features in QuickBooks Online. This guide walks you through the necessary steps to prepare your QuickBooks account for seamless integration with SyncTools.
IMPORTANT: Once multicurrency is enabled in QuickBooks, it cannot be turned off. Please read through this entire guide before proceeding.
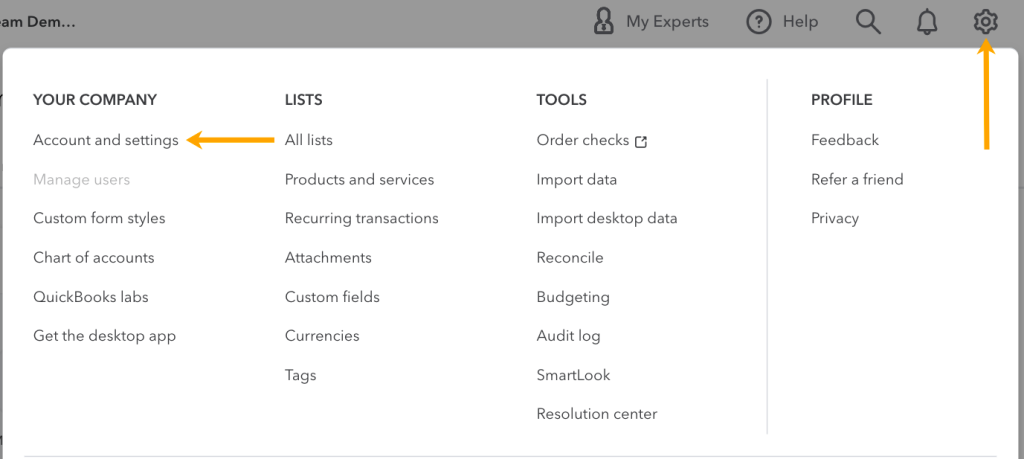
Step 1: Access Account and Settings #
- Log in to your QuickBooks Online account
- Click on the gear icon (⚙️) in the top right corner to open the settings menu
- Select “Account and settings” from the YOUR COMPANY column
Step 2: Navigate to Currency Settings #
- In Account and settings, click on the “Advanced” tab on the left sidebar
- Scroll down to find the “Currency” section

Step 3: Enable Multicurrency #
- In the Currency section, you’ll see your Home Currency already set (e.g., United States Dollar)
- Next to “Multicurrency,” click the checkbox to enable this feature
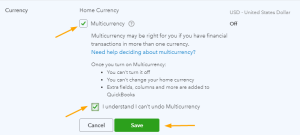
- Click on the “Manage Currencies” link
- On the Currencies page, you’ll see your home currency listed
- Click the “Add currency” button in the top right
- From the dropdown menu, select the currency you want to add (e.g., AUD – Australian Dollar)
- Click “Add” to confirm

Example: How Currency Conversion Works
Let’s say you sell a product for €100 EUR, and your home currency is USD:
- Shopify processes the payment and converts it to $110 USD
- SyncTools retrieves both the original amount (€100) and the converted amount ($110)
- SyncTools creates an entry in QuickBooks showing:
- Revenue of $110 USD


